How to Set Up a Docker Container (Beginner)
Welcome to this guide on setting up the Sendent for Outlook Docker container on a Linux system. We'll be using Ubuntu 24 (LTS) for this guide.
As a prerequisite, you need to set up a valid DNS record that points to your Ubuntu installation. Before starting, add a DNS A-record that directs your custom domain to the public IP of your Ubuntu installation. In this guide, we will use the IP '0.0.0.0' for our Ubuntu installation and the A-record 'outlook.sendent.dev'.
Installation
1. Update packages
First, we'll begin by updating the dependencies in your Ubuntu installation. Please follow any prompts that appear after running the following two commands.
apt-get update (fetch latest)
apt-get upgrade (download and install)
Depending on the available updates, some follow-up dialogs might appear. The guide does not cover this.
2. Install NGINX
We use NGINX as the reverse proxy, this will allow the Ubuntu installation to bind itself to the necessary docker port.
apt-get install nginx
3. Install Docker
With the following command, Docker will be downloaded and automatically installed on the Ubuntu machine.
curl -fsSL https://get.docker.com | sudo sh
4. Setting up Sendent for Outlook
Mount the ./usr directory.
Create a new directory in usr named sendent-outlook.
Create a new text-file, using nano nano docker-compose.yml. Please replace <YOURDOMAIN> with your actual own domain, with included protocol. For example: <YOURDOMAIN> becomes https://outlook.sendent.dev.
Please advice the following article and modify the docker compose file accordingly.
version: '3.9'services: sendent.outlook: image: rg.nl-ams.scw.cloud/sendent-public/sendent-outlook:latest platform: linux/amd64 build: context: . dockerfile: Dockerfile restart: on-failure environment: - BASE_URL=<YOURDOMAIN> - FEATURES_CODES_TO_REMOVE= ports: - "4300:4300" volumes: - ./docker-config:/usr/src/app/outlook-addin/docker-config networks: - node_network networks: node_network:Depending on the installation, you might want to remove certain features.
For "FEATURES_CODES_TO_REMOVE=" you can set the following values to remove certain buttons and events in the Outlook add-in:
0 = Remove Activity Tracker
1 = Remove Secure Mail
2 = Remove On-Send event actions
3 = Remove Nextcloud Talk Desktop
For free users we recommend the following:
BASE_URL=<YOURDOMAIN> FEATURES_CODES_TO_REMOVE=0,1,2For licensed users we recommend this:<YOURNEXTCLOUDDOMAIN> should for example be https://nextcloud.sendent.dev.
BASE_URL=<YOURDOMAIN> FEATURES_CODES_TO_REMOVE= DEFAULT_NEXTCLOUD_URL="<YOURNEXTCLOUDDOMAIN>"Save and close the file. Ctrl + X, Y and hit Enter.
From the same directory, now do: docker compose up -d. This will download and start the Sendent for Outlook docker container.
5. Configure NGINX
5.1. Configuring Site
After installation, navigate to the following folder:
./etc/nginx/sites-enabled
We will use 'nano' a text-editor to modify the config. If it's not there, we will automatically create it. Replace <YOURDOMAIN> with the domain you reserved for this service. For example: <YOURDOMAIN> could be replaced with outlook.sendent.dev.
nano <YOURDOMAIN>.conf
Copy and paste the following. You can paste it in nano with right mouse click.
Notice, modify the server_name that it reflects your own domain.
server { listen 80; server_name <YOURDOMAIN>; location / { proxy_pass http://127.0.0.1:4300; proxy_set_header Host $host; proxy_set_header X-Real-IP $remote_addr; proxy_set_header X-Forwarded-For $proxy_add_x_forwarded_for; proxy_set_header X-Forwarded-Proto $scheme; }}You can close and save nano by ctrl + x and when asked to save Y and hit enter.
Verify the NGINX config with nginx -t. There should be no errors.
5.2. Modifying default NGINX configuration
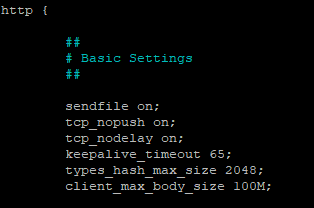
Next step is modifying the nginx configuration, so large files can be uploaded.
nano /etc/nginx/nginx.conf
You will notice there's a HTTP element add, the following line there.
client_max_body_size 250M; (the maximum file size will be 250MB with upload, you can increase this though).
Example client_max_body_size.
You can close and save nano by ctrl + x and when asked to save Y and hit enter.
Verify the NGINX config with nginx -t. There should be no errors.
Now let's reload NGINX by doing systemctl reload nginx.
6. Installing Let's Encrypt.
Within this guide we use the free Let's Encrypt service to enable a safe SSL connection. Let's encrypt will automatically configure our NGINX configuration further.
apt install certbot python3-certbot-nginx
After installation restart NGINX with systemctl reload nginx
Then we're going to generate the SSL certificates with the following command, notice replace <DOMAIN> with your own.
certbot --nginx -d <DOMAIN>
Example:
certbot --nginx -d outlook.sendent.dev
It will ask to enter your email, to agree with their (Let's Encrypt) Terms and Conditions.
7. Enabling the firewall
NOTE: Please double check if you whitelisted ALL necessary ports. The following section is recommended, but should be double checked on your own installation.
ufw allow 'Nginx Full' (allow port 80 and 443)
ufw allow 'OpenSSH' (allow port 22 ssh)
ufw enable (enable firewall)
8. Verify
If all went well, you can now access the manifest file that is hosted on your own server. You can do this for example by navigating in your browser to:
https://<YOURDOMAIN>/manifest.xml
Example:
https://outlook.sendent.dev/manifest.xml
The response should start with:
Example response.
Updates
In your usr directory, where the docker compose file is located run these commands, to update to the latest version for Sendent for Outlook.
# Pull the latest imagesdocker compose pull # Stop the running containersdocker compose down # Remove old containersdocker compose rm -f # Start the containers with the updated imagesdocker compose up -d


