How to Set Up and Configure an Azure Bot Resource
This guide will walk you through the process of setting up and configuring an Azure Bot for integration with Microsoft Teams. Follow these steps carefully to ensure a successful setup. Creating the Azure Bot Resource
1. Log in to the Azure Portal
Open your web browser and navigate to [Azure Portal] 'https://portal.azure.com' as an administrator and log in using your organization's credentials.
2. Create the Azure Bot Resource
1. Click the Create a Resource button.

2. In the search box at the top, enter Azure Bot and press enter.
3. Click on the Azure Bot option from the search results.

4. Click the Create button.

5. Enter the Bot handle. The Bot Handle is a unique identifier for your bot. You can choose a different Display Name for your bot in the Settings blade after bot creation.
6. Choose the resource group with which to associate the Bot. A resource group is a collection of resources that share the same lifecycle, permissions, and policies.
7. To further define boundaries for your data, specify an option for data residency. This limits the regions where data is stored and processed and the channels available for your bot.

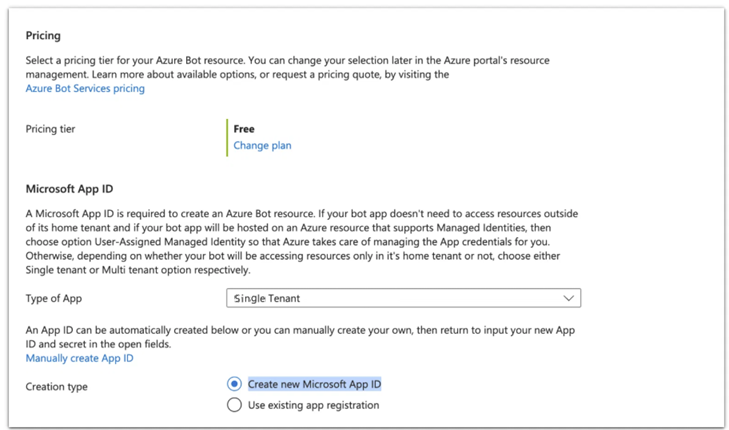
8. Select a pricing tier for your Azure Bot resource. You can change your selection later in the Azure portal's resource management.
Please note that the free plan should suffice.
9. Click the change plan option, select the free tier, and click the Select button.

10. Choose the type of App as single-tenant. This determines whether your bot will access resources only in its home tenant.
11. A Microsoft App ID is required to create an Azure Bot resource. Choose the option to create a new Microsoft App ID.
12. Click the "Review + Create" button.
13. Click the Create button to finish the process.

14. Once you've finished setting up the resource, you can proceed from the deployment overview to the actual Azure Bot resource itself.

Follow the instructions provided in the [Azure Bot Service Quickstart Registration](https://docs.microsoft.com/en-us/azure/bot-service/bot-service-quickstart-registration) to create a new Azure Bot resource.
3. Configuring the Azure Bot
In the Azure Bot resource, navigate to Settings > Configuration.
This section contains several settings you need to modify. Refer to the visual guidance provided in the Azure Portal for assistance.
1. Locate the "Messaging Endpoint" field.
2. Update the "Messaging Endpoint" to redirect to `https://<yourdomain>/api/messages`. For example, if your domain is `teams-installation.example.com,` the URL should be `https://teams-installation.example.com/api/messages.`

3. Ensure you save the Microsoft App ID displayed in the configuration settings. This ID will be necessary when setting up your docker container.
4. Within the Settings section, switch to the Channels tab.

5. Locate and click the Microsoft Teams and read and agree to the terms of service to proceed.

6. Ensure that the option 'Microsoft Teams Commercial' is chosen and click the Apply button.

Now that your Sendent bot resource is all set up you can now proceed to setup your docker container as highlighted in this article.
4. Modify bot framework as App Registration
In Azure, under resources, open 'App Registrations'.
Next, in your overview of 'App Registrations', open the just registered Azure Bot framework app-registration.
The presented new dialog should look as the following.

4.1. Authentication
Under Authentication, click 'Add a Platform'.
Choose Single-page application (SPA).

Here you set the following URL, notice, replace <tenantId> with your own Microsoft Azure Tenant ID.
https://login.microsoftonline.com/<tenantId>/oauth2/v2.0/token
Example:
https://login.microsoftonline.com/ed26c9c8-3a75-4d64-b1dd/oauth2/v2.0/token
Lastly, ensure that implicit grant and hybrid flows are set. Both tokens should be checked.

4.2. API Permissions
Under API Permissions, set the following permissions.
Add a Permissions > Microsoft Graph > Delegated Permission.
Name | Type | Description |
Chat.Read | Delegated | Read user chat messages. |
Chat.ReadBasic | Delegated | Read names and members of user chat threads. |
Chat.ReadWrite | Delegated | Read and write user chat messages. |
Chat.ReadWrite.All | Delegated | Read and write all chat messages. |
ChatMember.Read | Delegated | Read the members of chats. |
ChatMember.ReadWrite | Delegated | Add and remove members from chats. |
ChannelMember.Read.All | Application | Read the members of all channels. |
ChannelSettings.Read.All | Application | Read the names, descriptions, and settings of all channels. |
Group.Read.All | Delegated | Read all groups. |
TeamMember.Read.All | Delegated | Read the members of teams. |
Once the 10 permissions in total have been set, ensure to 'Grant admin consent for Tenant'.

4.3. Expose an API
Set your Application ID URI that is reflects the DNS record that is used with the Sendent for MS Teams service. The URI should contain api://domain/<appId>. The <appId> variable in this case is the same application (client) id that is used within this app registration.
api://msteams.example.com/<appId>
Example:
api://msteams.example.com/6f57d69d-cc65-439c-9bcf
Under 'Scopes' at the following entry (Add a scope).

Notice, the scope URI in the screenshot would look like api://msteams.example.com/6f57d69d-cc65-439c-9bcf/access_as_user, if the example DNS name was set.
The scope name should be access_as_user.
Ensure that 'who can consent' is set to both admins and users.
Verify that the 'State' is set to 'Enabled'.
Last settings would be authorizing the client applications. Add the following two client applications and ensure the above made scope is authorized.
Client Id | Description |
5e3ce6c0-2b1f-4285-8d4b-75ee78787346 | Microsoft Teams Web Client |
1fec8e78-bce4-4aaf-ab1b-5451cc387264 | Microsoft Teams |
The following screenshot provides a sample how the client id should be setup.

The overview of the settings page should look like this:
